Raspberry Pi ZERO OTG
September 3 2024
- Raspberry Pi ZERO OTG
- Ubuntu 23.10
- Ubuntu 24.04
- About Overlay
- Connecting Raspberry Pi ZERO to a PC
Set up the Raspberry Pi Zero in OTG mode so your PC can recognize it as a MIDI device. OTG means USB On-The-Go. It allows the Raspberry Pi to work like a USB device, similar to a keyboard or MIDI controller. In this setup, your PC acts as the host, and the Raspberry Pi Zero acts as the device. The Raspberry Pi 2 and 3 do not support this feature and can only work as USB hosts. In this example, we use a Raspberry Pi Zero.
The configuration may be a little difficult if you are not familiar with Linux. Rewrite the following two files.
-
Using a Linux text editor, add dtoverlay=dwc2 to the last line of /boot/config.txt
. I used "vi" for editor. - Open /boot/cmdline.txt with an editor. Search for rootwait and modify it to rootwait modules-load=dwc2,g_midi.
> pi@raspberrypi:~ $ sudo vi /boot/config.txt
In my case, the last part of config.txt looked like this:
...
...
  [pi4]
# Run as fast as firmware / board allows
arm_boost=1

[OTG]
dtoverlay=dwc2
> pi@raspberrypi:~ $ sudo vi /boot/cmdline.txt
In my case, I modified cmdline.txt and it looked like this:
  console=serial0,115200 console=tty1 root=PARTUUID=fe7ff3ab-02
  rootfstype=ext4 fsck.repair=yes rootwait quiet splash plymouth.ignore-serial-consoles
  cfg80211.ieee80211_regdom=JP rootwait modules-load=dwc2,g_midi quiet
Alternatively, you can modify the two files by executing the following two commands on the command line:
> pi@raspberrypi:~ $ sudo sed -i -e '$ a dtoverlay=dwc2' /boot/config.txt
> pi@raspberrypi:~ $ sudo sed -i s/rootwait/rootwait\ modules-load=dwc2,g_midi/ /boot/cmdline.txt
After modify these two files, reboot.
> pi@raspberrypi:~ $ sudo reboot
Ubuntu 23.10
In Ubuntu 23.10, the locations (directories) of the two files have been moved. The two files, config.txt and cmdline.txt, are located in /boot/firmware.
> cd /boot/firmware
> sudo vi config.txt
The last line of config.txt was written as follows:
[cm4]
# Enable the USB2 outputs on the IO board (assuming your CM4 is plugged
# into such a board)
dtoverlay=dwc2,dr_mode=host
Delete dr_mode=host and modify as follows:
[cm4]
# Enable the USB2 outputs on the IO board (assuming your CM4 is plugged
# into such a board)
dtoverlay=dwc2
The cmdline.txt edit is the same as above. Search for rootwait and edit it as rootwait modules-load=dwc2,g_midi.
You can check the Ubuntu version with the following command:
> cat /etc/os-release
  PRETTY_NAME="Ubuntu 23.10"
  NAME="Ubuntu"
  VERSION_ID="23.10"
  VERSION="23.10 (Mantic Minotaur)"
  ...
Ubuntu 24.04
For Ubuntu 24.04 on Raspberry Pi Zero 2, the two files config.txt and cmdline.txt are located in /boot/firmware. If you look at config.txt, you will see that dtoverlay (Device Tree overlay) is set several times as shown below.
  # Config settings specific to arm64
  arm_64bit=1
  dtoverlay=dwc2

  # Enable the KMS ("full" KMS) graphics overlay, leaving GPU memory as the
  # default (the kernel is in control of graphics memory with full KMS)
  dtoverlay=vc4-kms-v3d
  disable_fw_kms_setup=1

  [pi3+]
  # Use a smaller contiguous memory area, specifically on the 3A+ to avoid an
  # OOM oops on boot. The 3B+ is also affected by this section, but it shouldn't
  # cause any issues on that board
  dtoverlay=vc4-kms-v3d,cma-128

  [pi02]
  # The Zero 2W is another 512MB board which is occasionally affected by the same
  # OOM oops on boot.
  dtoverlay=vc4-kms-v3d,cma-128

  [all]

  [cm4]
  # Enable the USB2 outputs on the IO board (assuming your CM4 is plugged into
  # such a board)
  dtoverlay=dwc2,dr_mode=host

  [all]
To operate Raspberry pi in OTG mode, comment out the following line:
  [cm4]
  # Enable the USB2 outputs on the IO board (assuming your CM4 is plugged into
  # such a board)
  # dtoverlay=dwc2,dr_mode=host
Abaut Overlay
I researched as much as I could about Overlay.
- vc4-kms-v3d:
An overlay that enables the Raspberry Pi graphics stack. This overlay enables 3D acceleration on the Raspberry Pi, and is especially useful for graphics intensive applications and desktop environments. - cma-128:
This option sets the size of the "Contiguous Memory Allocator (CMA)" to 128MB. CMA is used to allocate a large contiguous memory area from system memory. It is often used as video memory. This setting allows for smoother 3D graphics and video playback. - dr_mode:
It stands for "Dual Role mode" and refers to the ability of a USB port to function as either a device (client) or a host. Devices like the Raspberry Pi can use their USB ports as both a host and a device. - host:
Specifies that the USB port should operate in host mode, which allows the Raspberry Pi to connect and operate USB devices such as USB keyboards, mice, and flash drives. Host mode is typically used as the default setting.
If you want to use your Raspberry Pi as a USB device (client) and connect it to a computer, you need to change the setting to dr_mode=device. In this case, your Raspberry Pi will act as a device of thr computer.
- disable_fw_kms_setup=1
Disables the firmware's setting of KMS (Kernel Mode Setting) for settings related to the boot process. KMS is a method in which the kernel directly controls the graphics mode settings. If disabled, the firmware does not configure KMS settings, and instead the Linux kernel is responsible for these settings. This can lead to potential compatibility issues with certain hardware and configurations, or memory may be managed differently.
When this setting is enabled, the Raspberry Pi firmware will set the display resolution and graphics mode at boot time. - OOM Error
Although the Zero 2W comes with 512MB of memory, it may experience out of memory errors ("Oops") during boot. An OOM error is when the system runs out of available memory and is unable to carry out required operations.
Connecting Raspberry Pi ZERO to a PC
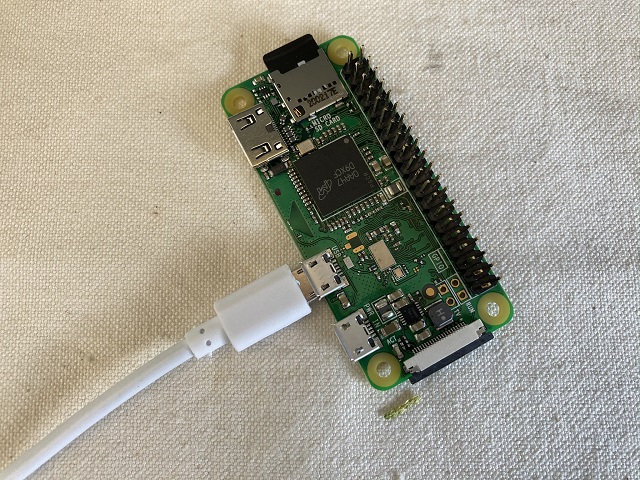
Connect to the PC via USB. Of the two USB connectors on the Raspberry Pi Zero, connect to the one in the center of the board that is marked USB.
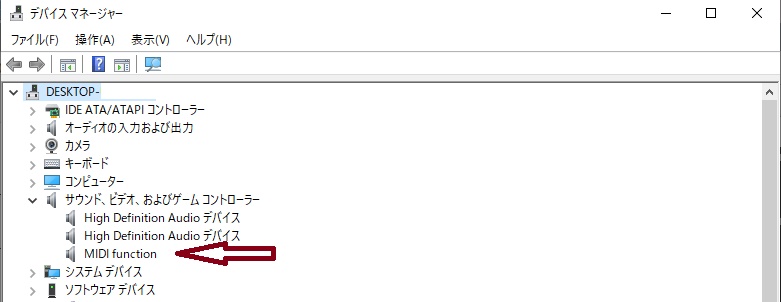
Open Device Manager, in the item of Sound, video and game controllers, MIDI function is added.
On the other hand, on Raspberry Pi Zero, you can use the amidi -l command to recognize the MIDI device with the name f_midi.
> pi@raspberrypi:~ $ amidi -l
Dir Device    Name
IO  hw:0,0    f_midi
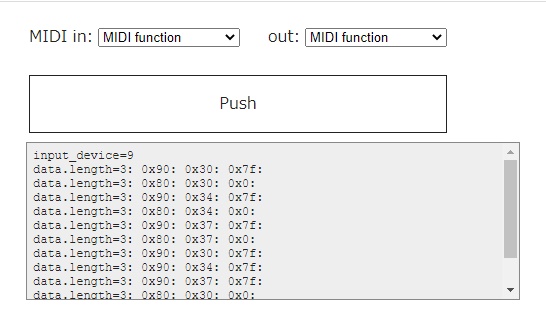
Using Web MIDI API, I check sending and receiving MIDI messages. Open this page on the PC side. Select MIDI function on both pull downmenus for MIDI IN: and MIDI OUT:
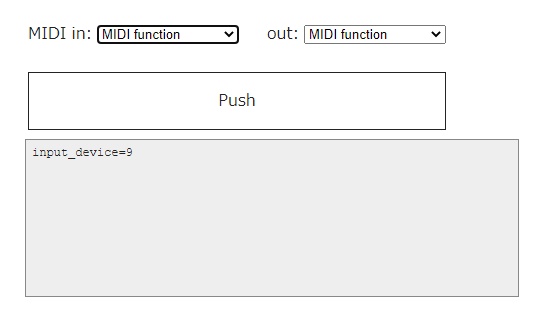
Open same page on Raspberry Pi Zero. Select f_midi on both pull downmenus for MIDI IN: and MIDI OUT:
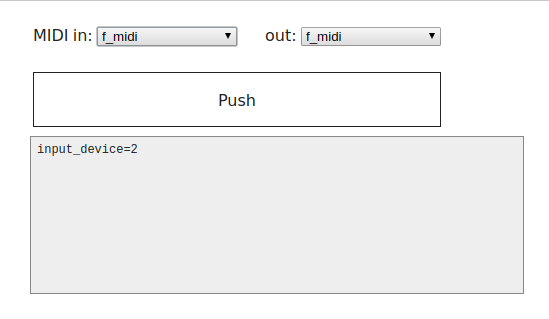
Touch the Push button on the PC. The MIDI will be received on the Raspberry Pi Zero browser.

Touch the Push button on Raspberry Pi Zero browser. The MIDI will be received on the PC.