Raspberry PiをrtpMIDIでPCにつなぐ
Raspberry PiをrtpMIDIでPCにつなぎます。具体的には、Raspberry PiにつながっているMIDI機器のMIDIを、Raspberry PiとPCをrtpMIDIで転送します。

よく考えると、MIDI機器を直接PCにつなげば?って思うかもしれませんが、その通りです。本来やりたいのはRaspberry Piにセンサーを付けて、Raspberry Pi自身をMIDIコントローラにして、PCと無線でつなぐ、ということです。準備段階としてRaspberry PiをrtpMIDIの機器として動作させます。

RaveloxMIDIの準備
Raspberry Piにインストールするソフトは、RaveloxMIDIというアプリケーションです。Githubにリポジトリhttps://github.com/ravelox/pimidiがあります。インストールは、こちらのサイトhttps://blog.tarn-vedra.de/pimidi-box/を参照しました。
コンソール画面でコマンド入力での作業です。以下の6個のアプリをインストールします。
sudo apt install -y git
sudo apt install -y pkg-config
sudo apt install -y libasound2-dev
sudo apt install -y libavahi-client-dev
sudo apt install -y autoconf
sudo apt install -y automake
既にインストールされていれば、以下のようにnewest versionがインストロール済みと表示されます。
pi@raspberrypi:~ $ sudo apt install -y git
Reading package lists... Done
Building dependency tree
Reading state information... Done
git is already the newest version (1:2.20.1-2+deb10u3).
0 upgraded, 0 newly installed, 0 to remove and 0 not upgraded.
raveloxのリポジトリからpimidiをクローンします。
git clone -b experimental https://github.com/ravelox/pimidi.git
pimidiなるディレクトリができていると思います。pmidiの下のraveloxmidiへチェンジディレクトリします。その後、2つのシェルを実行し、さらにメイクを実行します。ここまでで準備環境です。
cd pimidi/raveloxmidi/
./autogen.sh
./configure
make -j2
上のコマンドを実行すると、私の場合以下のように表示されました。
pi@raspberrypi:~/pimidi/raveloxmidi $ ./autogen.sh
configure.ac:14: installing './compile'
configure.ac:6: installing './config.guess'
configure.ac:6: installing './config.sub'
configure.ac:10: installing './install-sh'
configure.ac:10: installing './missing'
src/Makefile.am: installing './depcomp'

pi@raspberrypi:~/pimidi/raveloxmidi $ ./configure
checking build system type... armv7l-unknown-linux-gnueabihf
checking host system type... armv7l-unknown-linux-gnueabihf
checking target system type... armv7l-unknown-linux-gnueabihf
checking for a BSD-compatible install... /usr/bin/install -c
<<中略>>
config.status: creating raveloxmidi.spec
config.status: creating include/build_info.h
config.status: creating config.h
config.status: config.h is unchanged
config.status: executing depfiles commands

pi@raspberrypi:~/pimidi/raveloxmidi $ make -j2
make  all-recursive
make[1]: Entering directory '/home/pi/pimidi/raveloxmidi'
Making all in src
make[2]: Entering directory '/home/pi/pimidi/raveloxmidi/src'
gcc -DHAVE_CONFIG_H -I. -I..  -I ../include  -pthread -D_REENTRANT -I/usr/include/alsa -g -O2 -MT raveloxmidi-raveloxmidi.o -MD -MP -MF .deps/raveloxmidi-raveloxmidi.Tpo -c -o raveloxmidi-raveloxmidi.o `test -f 'raveloxmidi.c' || echo './'`raveloxmidi.c
<<中略>>
Making all in man
make[2]: Entering directory '/home/pi/pimidi/raveloxmidi/man'
make[2]: Nothing to be done for 'all'.
make[2]: Leaving directory '/home/pi/pimidi/raveloxmidi/man'
make[2]: Entering directory '/home/pi/pimidi/raveloxmidi'
make[2]: Leaving directory '/home/pi/pimidi/raveloxmidi'
make[1]: Leaving directory '/home/pi/pimidi/raveloxmidi'
最後にシステムにインストールします。
pi@raspberrypi:~/pimidi/raveloxmidi $ sudo make install
以下のように表示されます。
pi@raspberrypi:~/pimidi/raveloxmidi $ sudo make install
Making install in src
make[1]: Entering directory '/home/pi/pimidi/raveloxmidi/src'
make[2]: Entering directory '/home/pi/pimidi/raveloxmidi/src'
 /bin/mkdir -p '/usr/local/bin'
  /usr/bin/install -c raveloxmidi '/usr/local/bin'
make[2]: Nothing to be done for 'install-data-am'.
make[2]: Leaving directory '/home/pi/pimidi/raveloxmidi/src'
make[1]: Leaving directory '/home/pi/pimidi/raveloxmidi/src'
Making install in man
make[1]: Entering directory '/home/pi/pimidi/raveloxmidi/man'
make[2]: Entering directory '/home/pi/pimidi/raveloxmidi/man'
make[2]: Nothing to be done for 'install-exec-am'.
 /bin/mkdir -p '/usr/local/share/man/man1'
 /usr/bin/install -c -m 644 raveloxmidi.1 '/usr/local/share/man/man1'
make[2]: Leaving directory '/home/pi/pimidi/raveloxmidi/man'
make[1]: Leaving directory '/home/pi/pimidi/raveloxmidi/man'
make[1]: Entering directory '/home/pi/pimidi/raveloxmidi'
make[2]: Entering directory '/home/pi/pimidi/raveloxmidi'
make[2]: Nothing to be done for 'install-exec-am'.
make[2]: Nothing to be done for 'install-data-am'.
make[2]: Leaving directory '/home/pi/pimidi/raveloxmidi'
make[1]: Leaving directory '/home/pi/pimidi/raveloxmidi'
Configulationの準備とraveloxmidiの起動
MIDI機器をRaspberry Piに接続します。接続した機器をConfigulationに記載します。接続したMIDI機器は"amidi -l"で確認できます。
pi@raspberrypi:~/pimidi/raveloxmidi $ amidi -l
Dir Device    Name
IO  hw:1,0,0  nanoKEY2 MIDI 1
Configulationファイル(/etc/raveloxmidi.conf)を作成します。私はviを使っていますので以下のようなコマンドになります。
sudo vi /etc/raveloxmidi.conf
ファイルに記載する内容は以下の通りです。入力デバイスとして、"amidi -l"で発見したMIDI機器のデバイス番号を記載します。
alsa.input_device = hw:1,0,0
network.bind_address=0.0.0.0
logging.enabled=yes
logging.log_level=normal
raveloxmidiを起動します。
sudo raveloxmidi -dN -c /etc/raveloxmidi.conf
WINDOWSでrtpMIDIを起動
rtpMIDIをhttps://www.tobias-erichsen.de/software/rtpmidi.htmlからダウンロードします。インストール方法は、「WINDOWS PC とiPhoneをrtpMIDIでつなぐ」のページを参照して下さい。
rtpMIDIを起動するといかのような画面が表示されます。
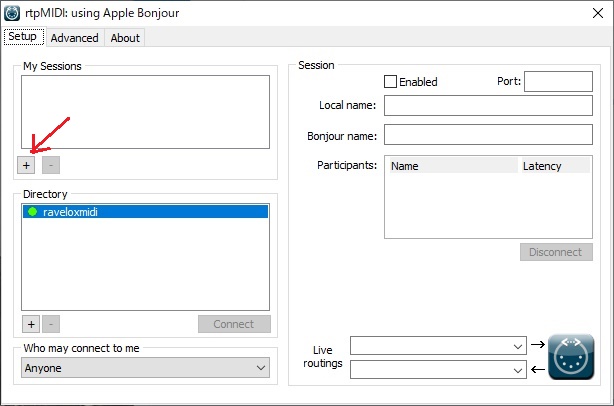
既に、raveloxmidiが起動していれば、Directoryにraveloxmidiが表示されていると思います。《注意》Windows PCとRaspberry PIは同一のアクセスポイントに接続されていないとなりません。My Sessions の下のプラスボタンを押します。コンピュータのデバイス名が表示されます。
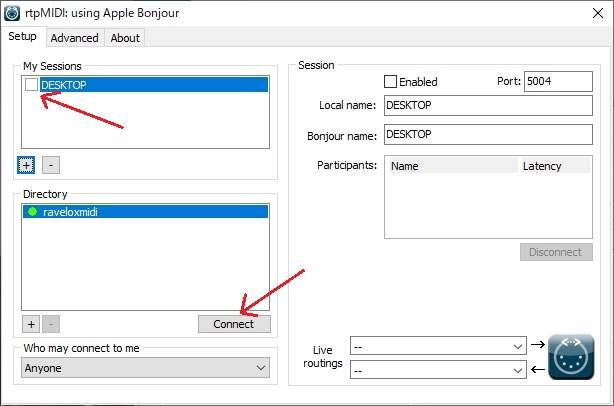
Mysessionのデバイス名左のチェックボックスをチェックします。また、Directoryの下のConnectボタンを押します。
右側のこれまでグレーアウトしていたpatiopants:覧が黒く表示され、Latencyが表示されます。
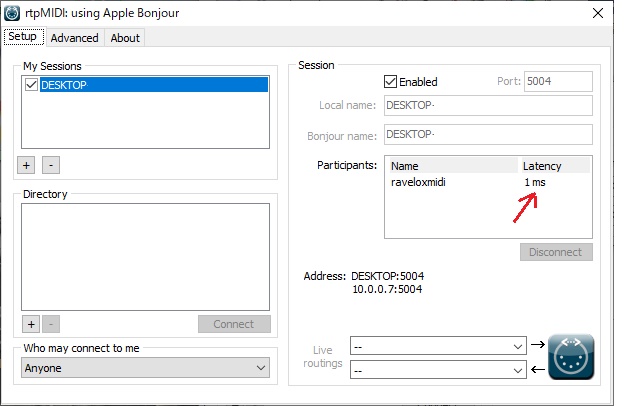
これで接続はOKです。
Raspberry PiからMIDIを送信、PCで受信
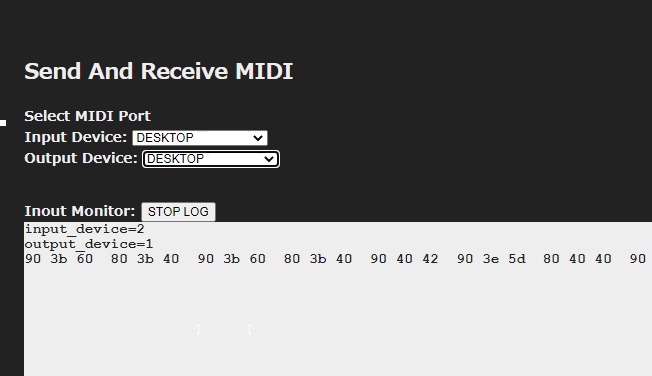
MIDI Send and Recieveを使って、MIDIの受信を確認します。Output Device, Input Device の選択しに、rtpMIDIで設定したデバイス名が表示されていると思います。Raspberry Piにつながっている鍵盤を弾くと、Send and Recieveの画面にMIDIのデータが表示されます。
PCからのMIDIを送信、Raspberry Piで受信
PCからのMIDIをRaspberry Piで受信し、Raspberry PiにつながっているMIDI機器を鳴らします。この構成は前述のRaspberry Piを送信側とする構成より、もっと使わないかもしれません。技術的な興味だけでつなげてみたいと思います。受信するには/etc/raveloxmidi.confに、alsa.output_deviceを設定します。
alsa.input_device = hw:1,0,0
alsa.input_device = hw:2,0,0
network.bind_address=0.0.0.0
logging.enabled=yes
logging.log_level=normal
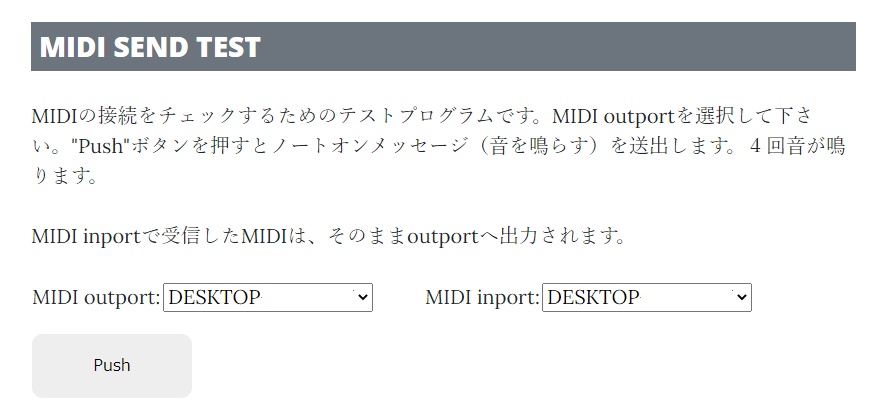
MIDI SEND TESTのページで、Raspberry PiへMIDIを送信し、Raspberry Piがこれを受信、Raspberry PiにつながっているMIDI機器から音が出ることを確認できます。
rtpMIDIは、4つのデバイスで動作することが確認できています。 Windows PC, Mac, iPhone, Raspberry Piの4つです。それぞれのデバイス間で接続を確認します。
rtpMIDIまとめ