Mac Apple silicon
2025/12/12 追記
Apple siliconの場合、以下の開発環境からアップデートしないとcmakeとmakeが通らなくなりました。
まず、GNU Embedded Toolchain for Armをアップデートします。 下のインストール方法でインストールしたToolchainはIntel Mac用です。以下のコマンドで確認できます。
>file /Applications/ARM/bin/arm-none-eabi-gcc
arm-none-eabi-gcc: Mach-O 64-bit executable x86_64
Intel Mac用のToolchainを使うとcmakeが極端に遅くなり、
-- Configuring done (103.0s)
で、止まってしまい最後まで終了しません。
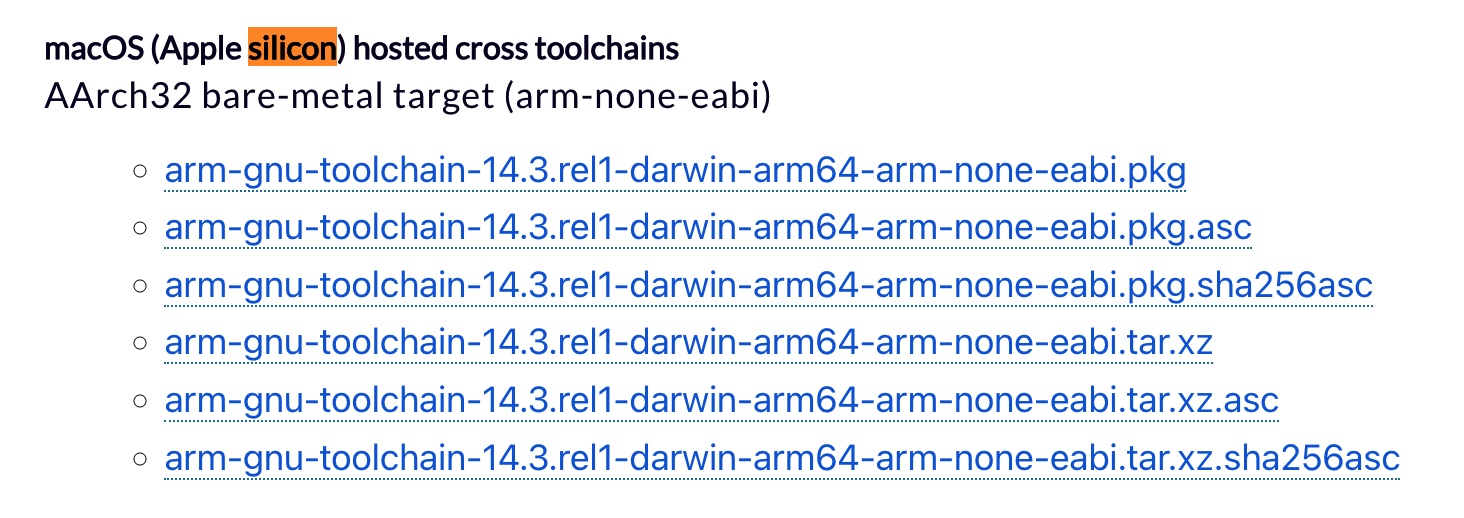
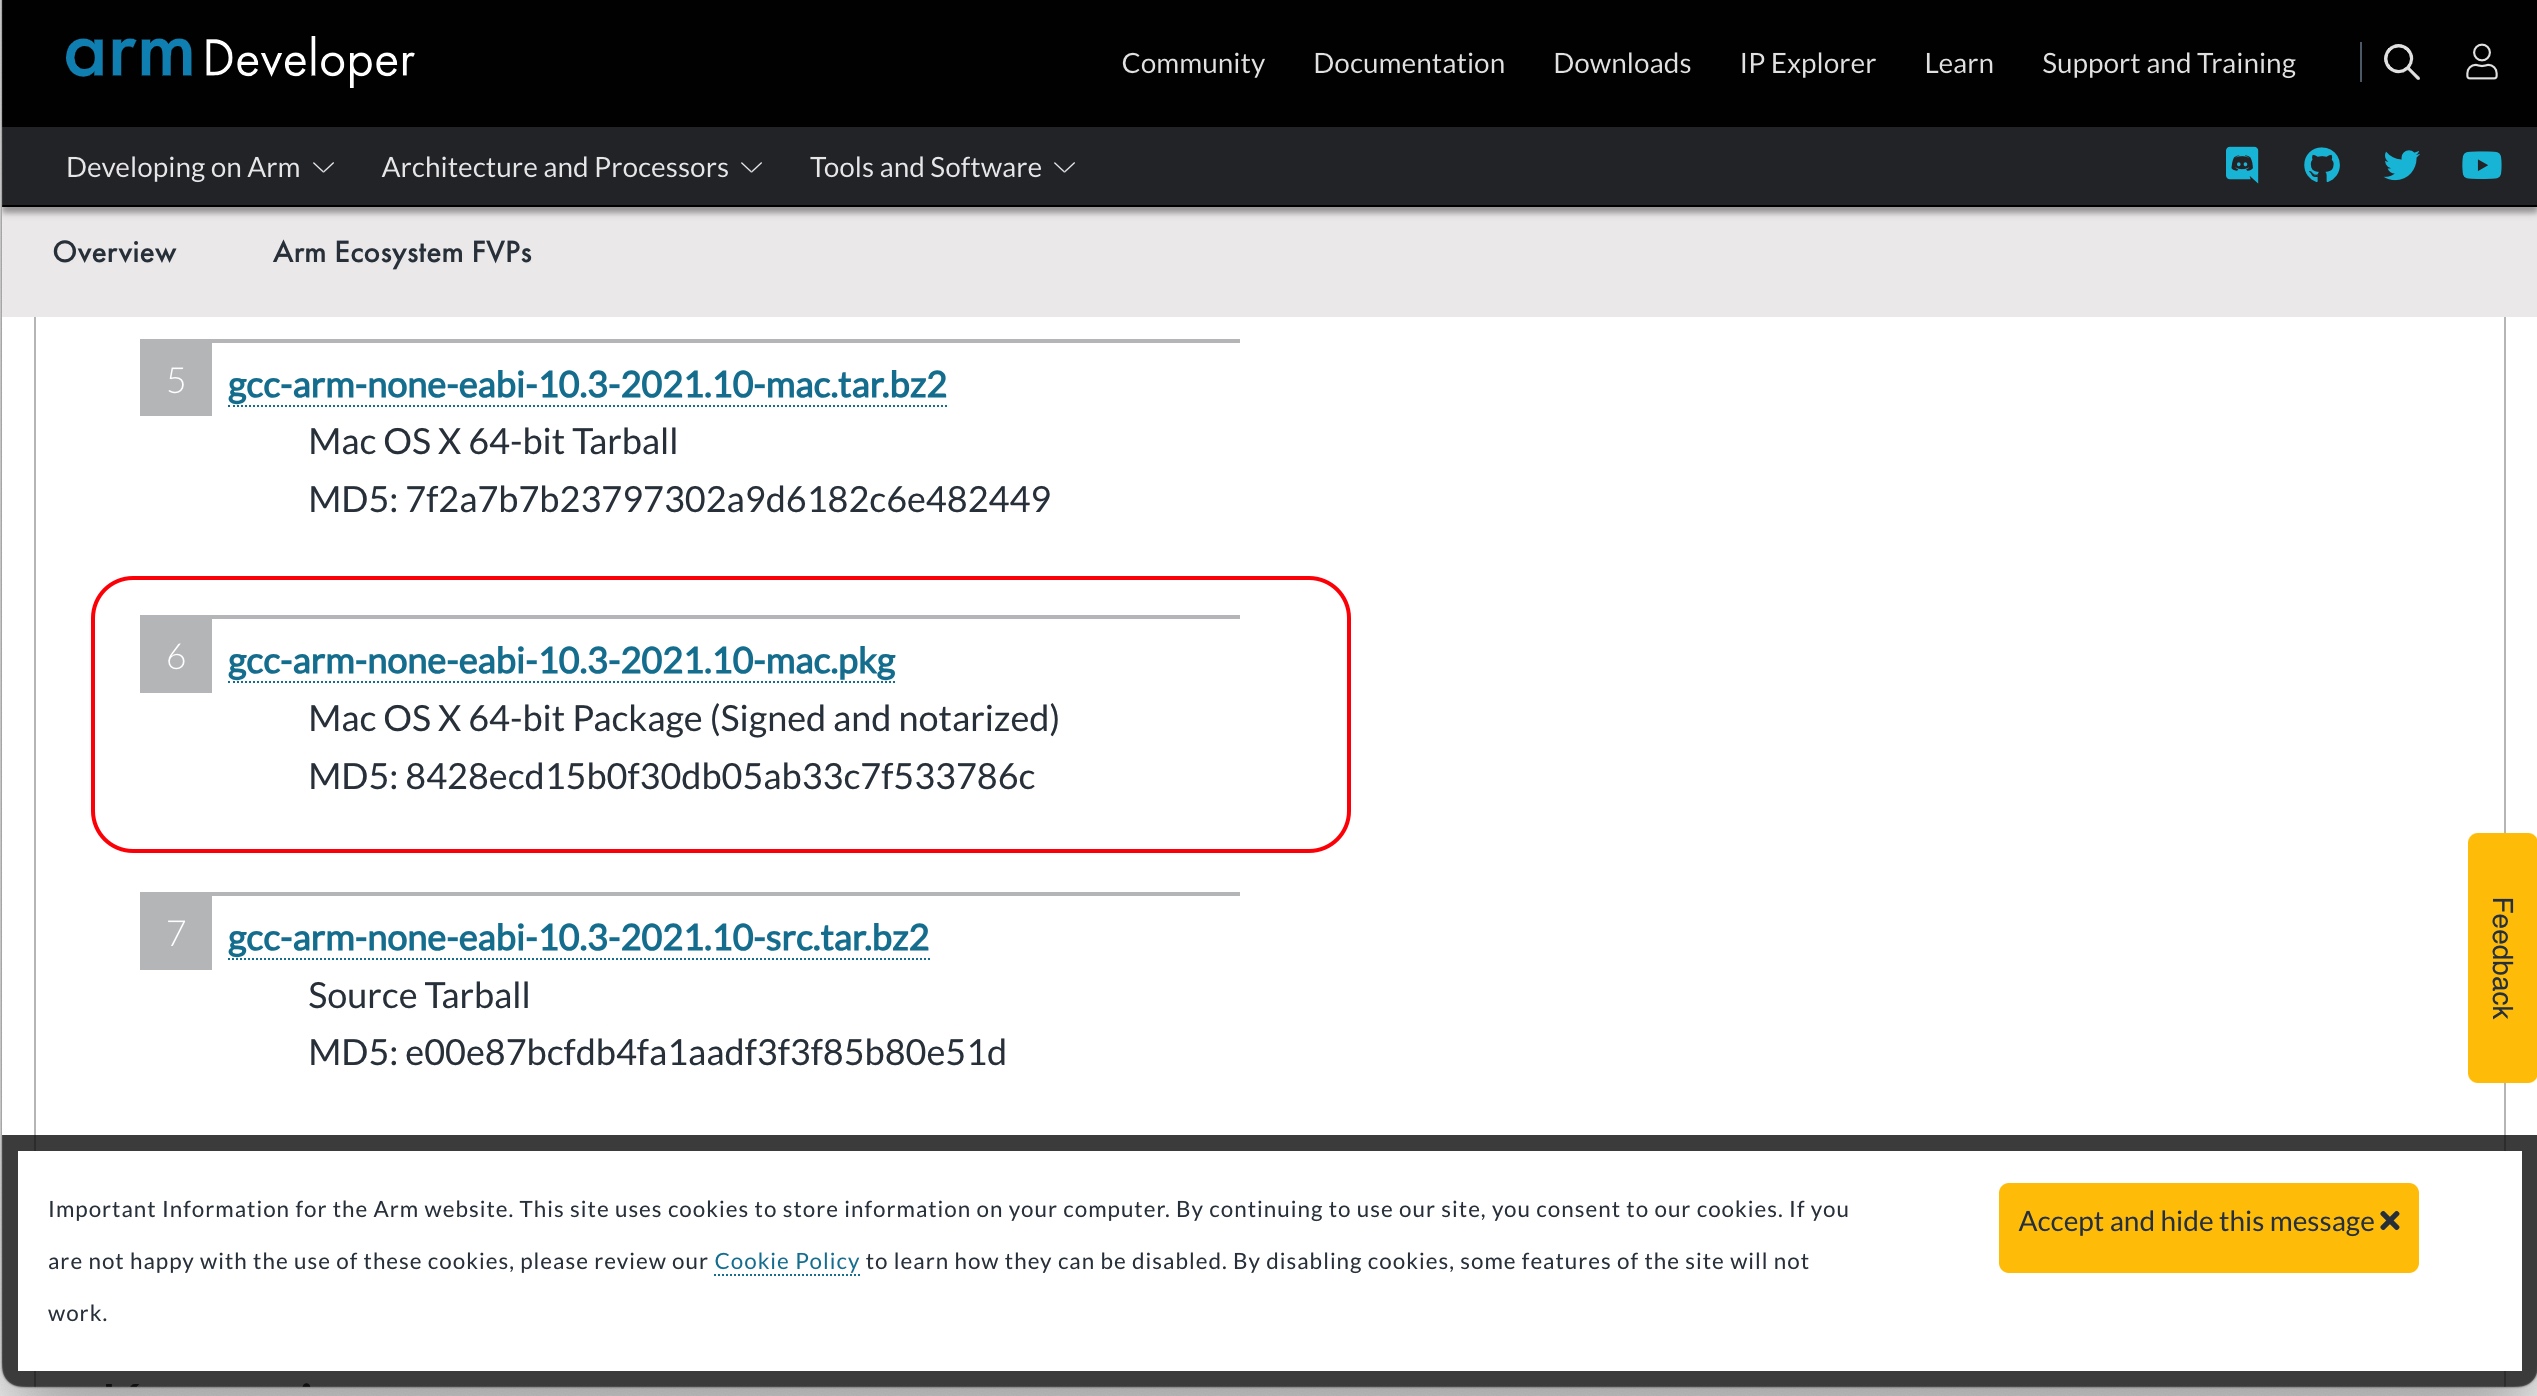
https://developer.arm.com/downloads/-/arm-gnu-toolchain-downloads
からApple Silicon用をダウンロードします。ここでは、.pkgをダウンロードしました。
- CMakeのバージョンについて -
CMakeのバージョンを4.2にアップデートしたところ、Generating done に以下の通り時間がかかることがわかりました。
CMake 4.2
-- Configuring done (9.6s)
-- Generating done (27.3s)
この現象はv4.1, v3.31でも発生します。
CMake 3.31
-- Configuring done (22.9s)
-- Generating done (63.6s)
v3.29であれば素早くCMakeが通りましたので、v3.29を使うことにしました。
CMake 2.29
-- Configuring done (0.8s)
-- Generating done (0.2s)
Raspberry Pi Picoの開発環境設定 - Mac -
Raspberry Pi Picoの環境を、Macbook Pro 2019, Mac Os Ventura OS13.5にインストールします。 インストールするのは、CMake, GNU Embedded Toolchain for Arm, Pico SDK, Pico Example の4つです。
インストールは 「Raspberry Pi Picoをセットアップしよう」 を参照しました。
CMakeのインストール
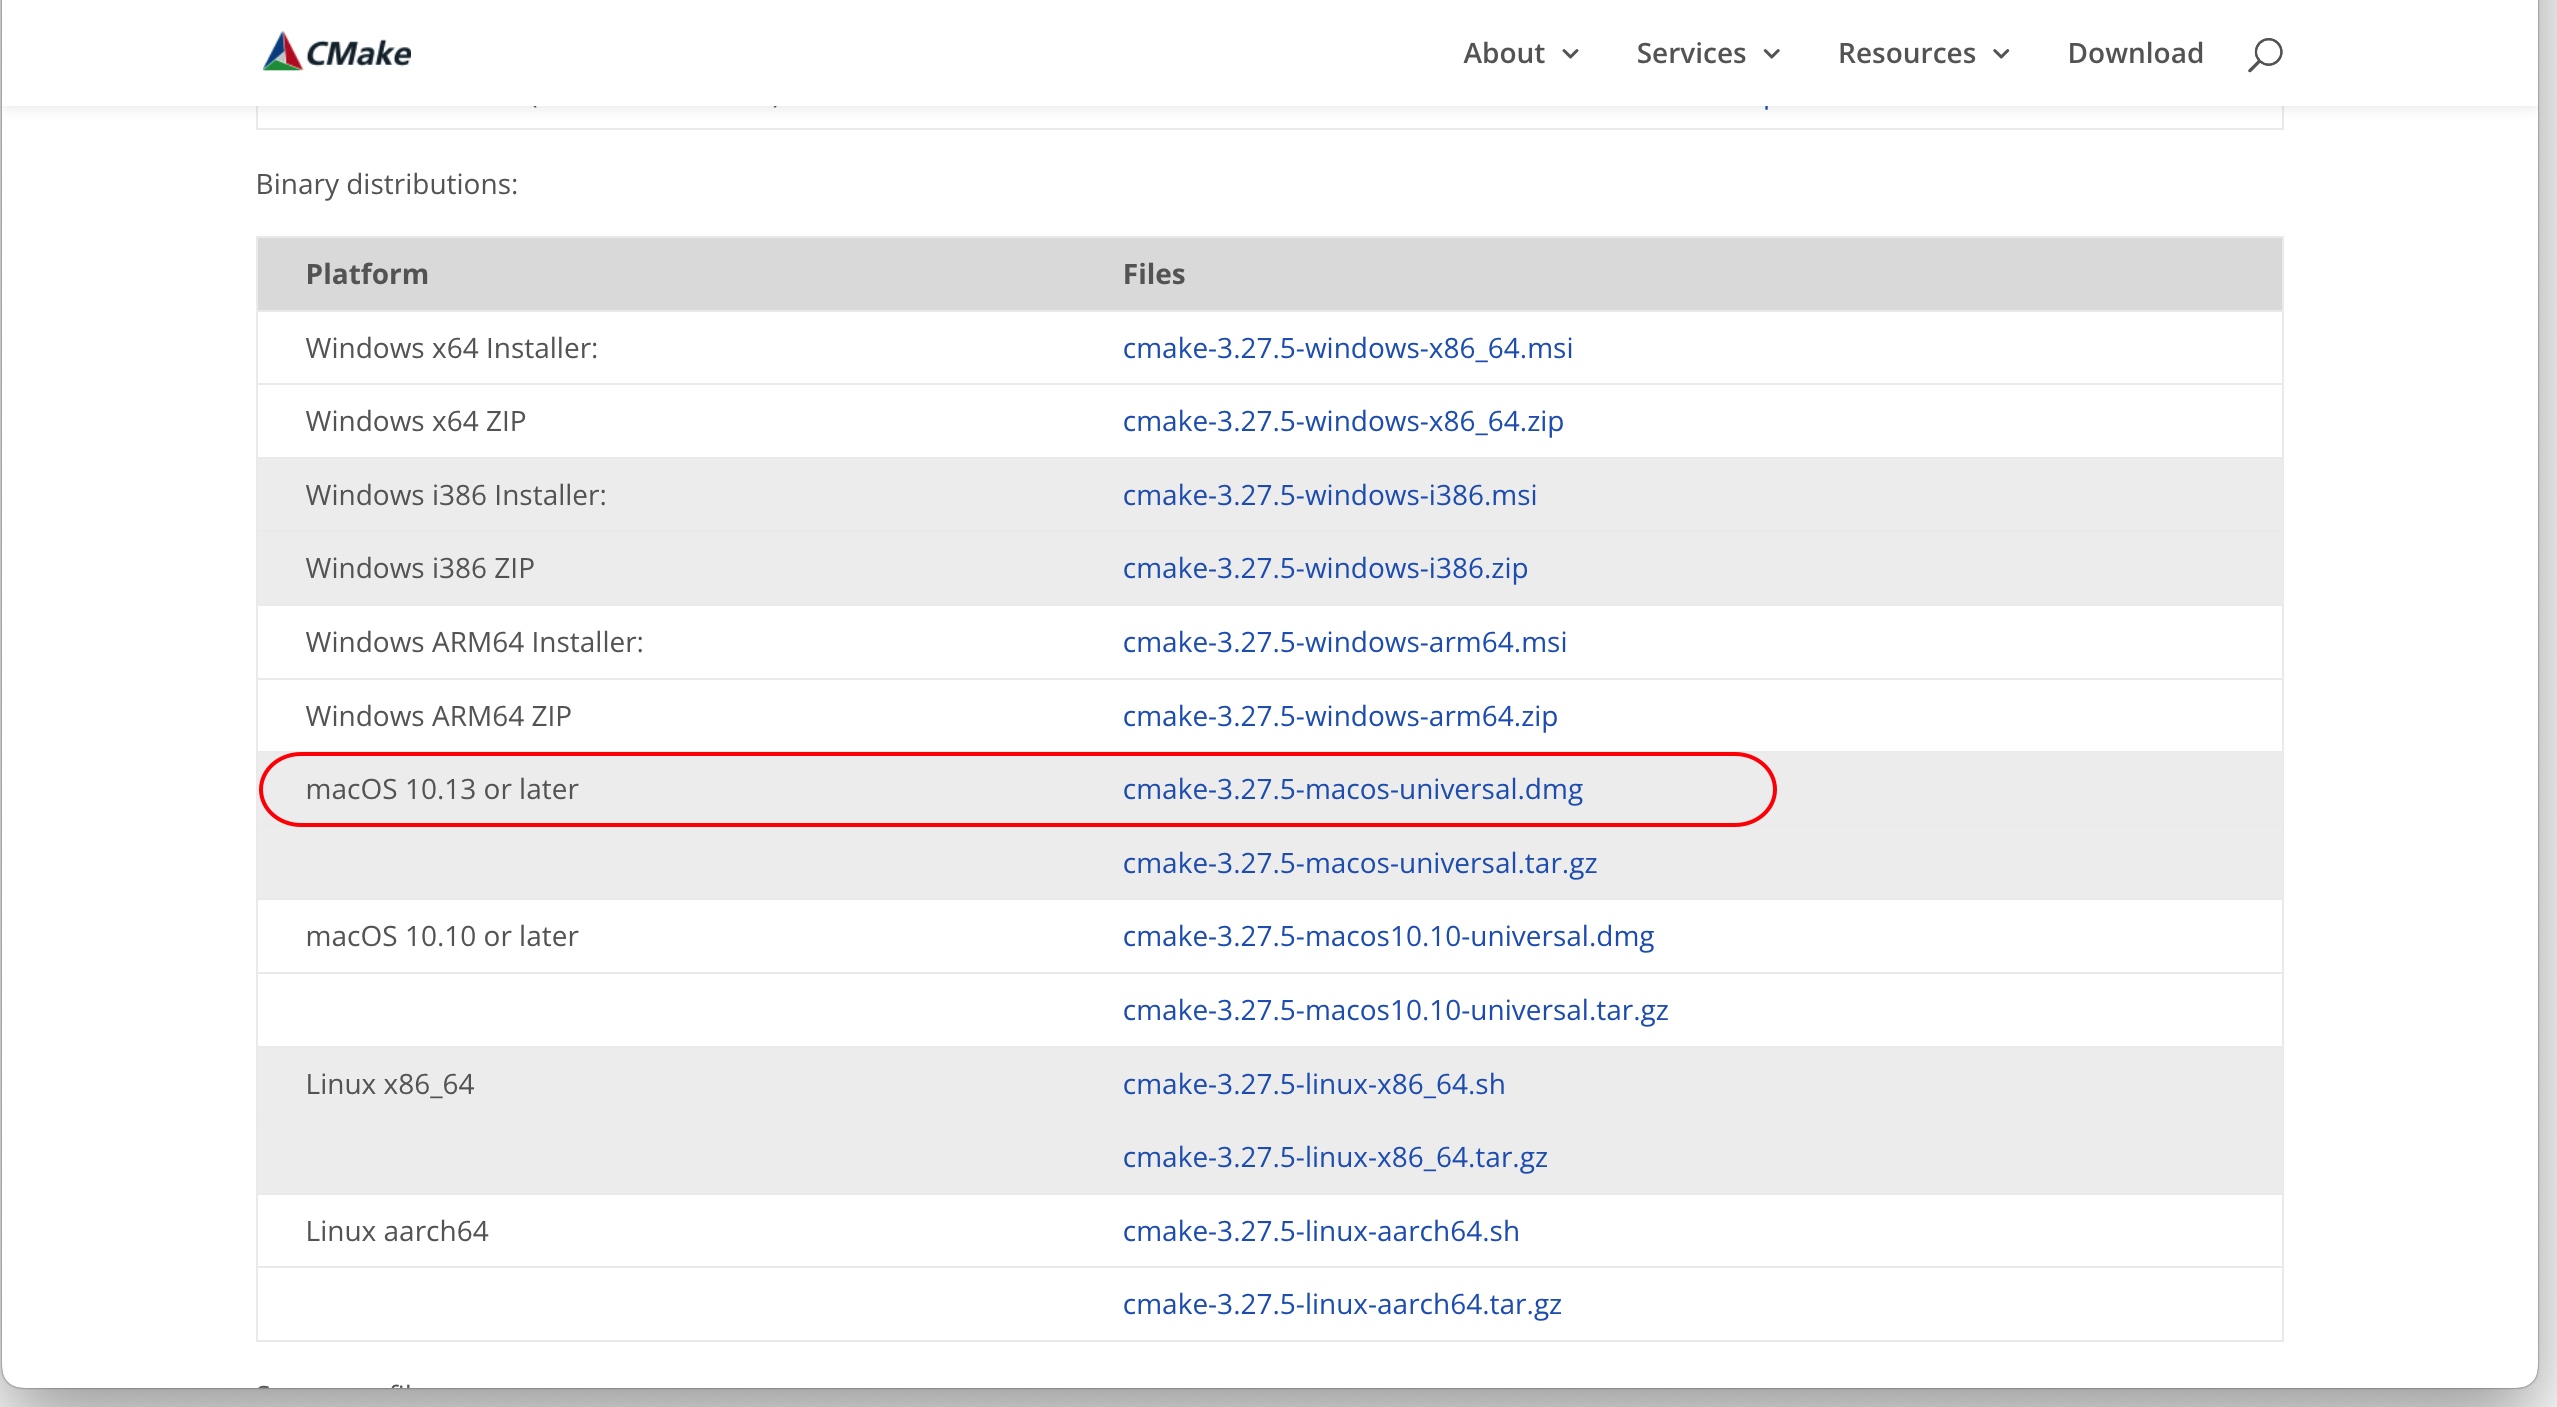
CMakeはこちらのダウンロードサイトからダウンロードします。ページを下へ辿ると macOS 10.13 or laterという項目があります。私は、cmake-3.27.5-macos-universal.dmgを ダウンロードしました。
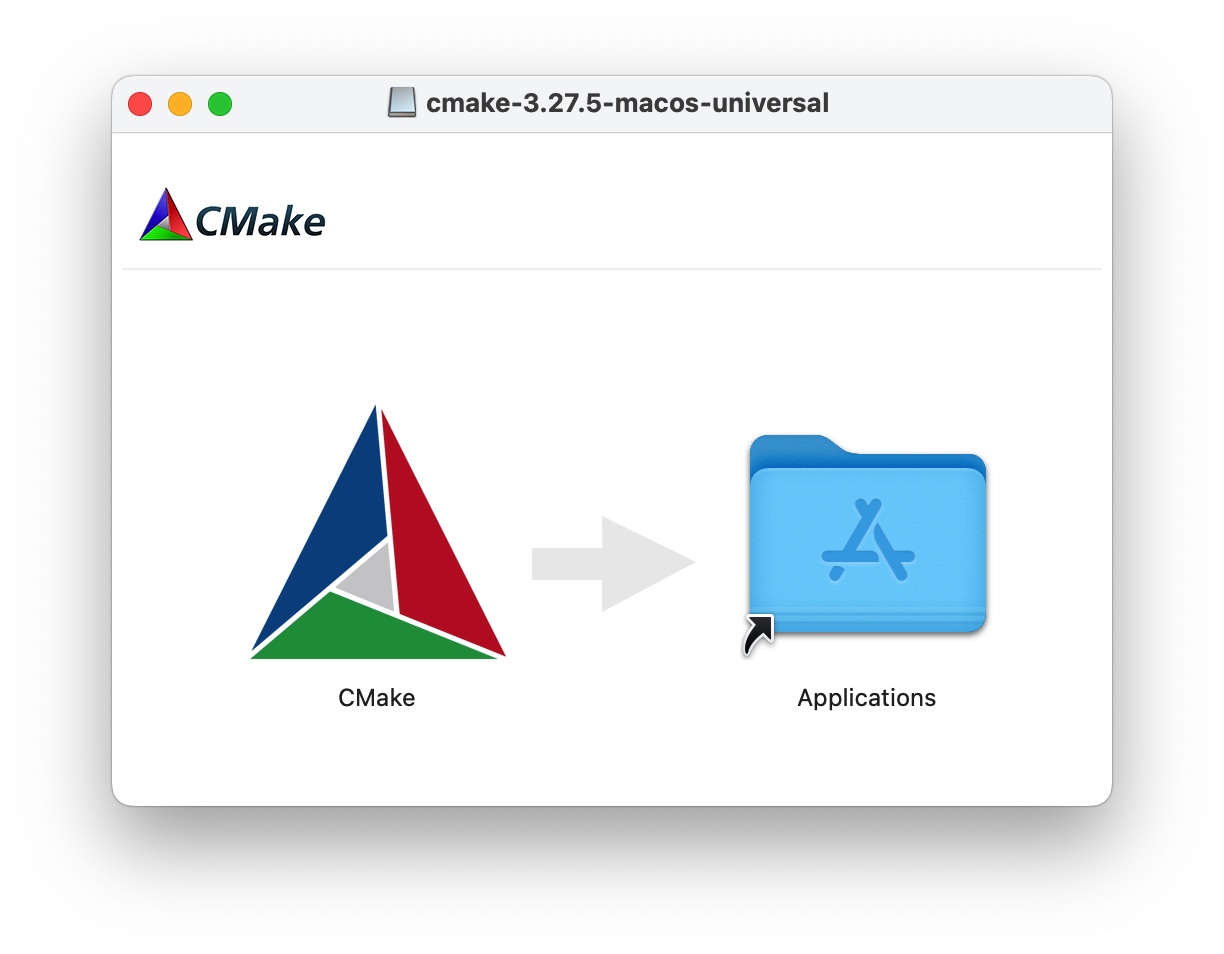
CMakeのアイコンをApplicationsにコピーします。
CMakeのアプリケーションにPATHを通します。Terminalを開き、以下の行をコピー&ペーストしてください。
> echo export PATH='/Applications/CMake.app/Contents/bin:$PATH' >> ~/.zshrc
GNU Embedded Toolchain for Armのインストール
GNU Embedded Toolchain for Armはこちらのダウンロードサイトからダウンロードします。ページを下へ辿り、gcc-arm-none-eabi-10.3-2021.10-mac.pkg をダウンロードします。
ARMの開発環境へPATHを通します。
  > echo export PATH='/Applications/ARM/bin:$PATH' >> ~/.zshrc
  > echo export PATH='/Applications/ARM/arm-none-eabi/bin:$PATH' >> ~/.zshrc
pico sdkとpico exampleのインストール
まず、picoの作業用のフォルダを作成します。場所はどこでも良いのですが、以下のようにターミナルで作成しました。
> mkdir ~/pico
pico sdkとpico exampleをgithubからダウンロードします。
  > cd ~/pico
  > git clone https://github.com/raspberrypi/pico-sdk.git --branch master
  > cd pico-sdk
  > git submodule update --init
  > cd ..
  > git clone https://github.com/raspberrypi/pico-examples.git --branch master
buildの前にpico-sdkとpico-examplesのディレクトリを環境変数に設定します。.zshrcに以下を追加します。
export PICO_SDK_PATH=~/pico/pico-sdk
export PICO_EXAMPLE_PATH=~/pico/pico-examples
.zshrcの環境変数追加を反映するためにターミナルを一旦クローズして、再度開き直します。 以下のコマンドで、環境変数が設定されていることを確認できます。
>env | grep "PICO"
pico-exampleをbuildします。まず、buildフォルダをpicoフォルダの下に作成します。 その上で、buildフォルダに移動しcmakeを行います。
  > cd ~/pico
  > mkdir build
  > cd build
  > cmake ../pico-examples
その上でmakeします。
> make
これで、buildフォルダーにExampleをコンパイルした結果が格納されています。 例えば、build/blink/blink.uf2のような.uf2ファイルがpicoボードにインストールできるファイルです。 build フォルダーの下にどのようなuf2ファイルがあるかfindコマンドで調べてみます。
  > cd build
  > find ./ -name '*.uf2'
  .//blink/blink.uf2
  .//pio/clocked_input/pio_clocked_input.uf2
  .//pio/differential_manchester/pio_differential_manchester.uf2
  .//pio/hello_pio/hello_pio.uf2
  .//pio/ws2812/pio_ws2812.uf2
  .//pio/ws2812/pio_ws2812_parallel.uf2
  .//pio/pwm/pio_pwm.uf2
  .//pio/manchester_encoding/pio_manchester_encoding.uf2
  .//pio/i2c/pio_i2c_bus_scan.uf2
  .//pio/uart_tx/pio_uart_tx.uf2
  .//pio/apa102/pio_apa102.uf2
  .//pio/logic_analyser/pio_logic_analyser.uf2
  .//pio/squarewave/pio_squarewave.uf2
  .//pio/spi/pio_spi_flash.uf2
  .//pio/spi/pio_spi_loopback.uf2
  .//pio/st7789_lcd/pio_st7789_lcd.uf2
  .//pio/ir_nec/ir_loopback/pio_ir_loopback.uf2
  .//pio/quadrature_encoder/pio_quadrature_encoder.uf2
  .//pio/pio_blink/pio_blink.uf2
  .//pio/onewire/pio_onewire.uf2
  .//pio/hub75/pio_hub75.uf2
  .//pio/uart_rx/pio_uart_rx_intr.uf2
  .//pio/uart_rx/pio_uart_rx.uf2
  .//pio/addition/pio_addition.uf2
  .//hello_world/usb/hello_usb.uf2
  .//hello_world/serial/hello_serial.uf2
  .//cmake/build_variants/build_variant1.uf2
  .//cmake/build_variants/build_variant2.uf2
  .//picoboard/blinky/picoboard_blinky.uf2
  .//picoboard/button/picoboard_button.uf2
  .//pwm/hello_pwm/hello_pwm.uf2
  .//pwm/led_fade/pwm_led_fade.uf2
  .//pwm/measure_duty_cycle/pwm_measure_duty_cycle.uf2
  .//clocks/hello_gpout/hello_gpout.uf2
  .//clocks/hello_48MHz/hello_48MHz.uf2
  .//clocks/detached_clk_peri/clocks_detached_clk_peri.uf2
  .//clocks/hello_resus/hello_resus.uf2
  .//multicore/multicore_runner/multicore_runner.uf2
  .//multicore/hello_multicore/hello_multicore.uf2
  .//multicore/multicore_fifo_irqs/multicore_fifo_irqs.uf2
  .//multicore/multicore_runner_queue/multicore_runner_queue.uf2
  .//interp/hello_interp/hello_interp.uf2
  .//timer/hello_timer/hello_timer.uf2
  .//timer/timer_lowlevel/timer_lowlevel.uf2
  .//timer/periodic_sampler/periodic_sampler.uf2
  .//i2c/ssd1306_i2c/ssd1306_i2c.uf2
  .//i2c/lcd_1602_i2c/lcd_1602_i2c.uf2
  .//i2c/lis3dh_i2c/lis3dh_i2c.uf2
  .//i2c/ht16k33_i2c/ht16k33_i2c.uf2
  .//i2c/mpu6050_i2c/mpu6050_i2c.uf2
  .//i2c/bmp280_i2c/bmp280_i2c.uf2
  .//i2c/slave_mem_i2c/slave_mem_i2c.uf2
  .//i2c/pcf8523_i2c/pcf8523_i2c.uf2
  .//i2c/bus_scan/i2c_bus_scan.uf2
  .//i2c/mpl3115a2_i2c/mpl3115a2_i2c.uf2
  .//i2c/pa1010d_i2c/pa1010d_i2c.uf2
  .//i2c/mma8451_i2c/mma8451_i2c.uf2
  .//i2c/mcp9808_i2c/mcp9808_i2c.uf2
  .//usb/host/tinyusb_host_examples/cdc_msc_hid/tinyusb_host_cdc_msc_hid.uf2
  .//usb/host/tinyusb_host_examples/hid_controller/tinyusb_host_hid_controller.uf2
  .//usb/host/tinyusb_host_examples/msc_file_explorer/tinyusb_host_msc_file_explorer.uf2
  .//usb/host/tinyusb_host_examples/bare_api/tinyusb_host_bare_api.uf2
  .//usb/host/host_cdc_msc_hid/host_cdc_msc_hid.uf2
  .//usb/device/dev_hid_composite/dev_hid_composite.uf2
  .//usb/device/tinyusb_device_examples/cdc_msc/tinyusb_dev_cdc_msc.uf2
  .//usb/device/tinyusb_device_examples/webusb_serial/tinyusb_dev_webusb_serial.uf2
  .//usb/device/tinyusb_device_examples/hid_multiple_interface/tinyusb_dev_hid_multiple_interface.uf2
  .//usb/device/tinyusb_device_examples/hid_generic_inout/tinyusb_dev_hid_generic_inout.uf2
  .//usb/device/tinyusb_device_examples/msc_dual_lun/tinyusb_dev_msc_dual_lun.uf2
  .//usb/device/tinyusb_device_examples/audio_test/tinyusb_dev_audio_test.uf2
  .//usb/device/tinyusb_device_examples/dfu/tinyusb_dev_dfu.uf2
  .//usb/device/tinyusb_device_examples/midi_test/tinyusb_dev_midi_test.uf2
  .//usb/device/tinyusb_device_examples/audio_4_channel_mic/tinyusb_dev_audio_4_channel_mic.uf2
  .//usb/device/tinyusb_device_examples/usbtmc/tinyusb_dev_usbtmc.uf2
  .//usb/device/tinyusb_device_examples/video_capture/tinyusb_dev_video_capture.uf2
  .//usb/device/tinyusb_device_examples/hid_composite/tinyusb_dev_hid_composite.uf2
  .//usb/device/tinyusb_device_examples/uac2_headset/tinyusb_dev_uac2_headset.uf2
  .//usb/device/tinyusb_device_examples/cdc_dual_ports/tinyusb_dev_cdc_dual_ports.uf2
  .//usb/device/tinyusb_device_examples/board_test/tinyusb_dev_board_test.uf2
  .//usb/device/tinyusb_device_examples/dfu_runtime/tinyusb_dev_dfu_runtime.uf2
  .//usb/device/tinyusb_device_examples/dynamic_configuration/tinyusb_dev_dynamic_configuration.uf2
  .//usb/device/dev_lowlevel/dev_lowlevel.uf2
  .//system/hello_double_tap/hello_double_tap.uf2
  .//system/unique_board_id/unique_board_id.uf2
  .//system/narrow_io_write/narrow_io_write.uf2
  .//flash/cache_perfctr/flash_cache_perfctr.uf2
  .//flash/program/flash_program.uf2
  .//flash/xip_stream/flash_xip_stream.uf2
  .//flash/ssi_dma/flash_ssi_dma.uf2
  .//flash/nuke/flash_nuke.uf2
  .//spi/bme280_spi/bme280_spi.uf2
  .//spi/spi_dma/spi_dma.uf2
  .//spi/max7219_32x8_spi/max7219_32x8_spi.uf2
  .//spi/mpu9250_spi/mpu9250_spi.uf2
  .//spi/max7219_8x7seg_spi/max7219_8x7seg_spi.uf2
  .//spi/spi_master_slave/spi_master/spi_master.uf2
  .//spi/spi_master_slave/spi_slave/spi_slave.uf2
  .//spi/spi_flash/spi_flash.uf2
  .//watchdog/hello_watchdog/hello_watchdog.uf2
  .//adc/joystick_display/joystick_display.uf2
  .//adc/adc_console/adc_console.uf2
  .//adc/microphone_adc/microphone_adc.uf2
  .//adc/onboard_temperature/onboard_temperature.uf2
  .//adc/hello_adc/hello_adc.uf2
  .//adc/read_vsys/read_vsys.uf2
  .//adc/dma_capture/adc_dma_capture.uf2
  .//divider/hello_divider.uf2
  .//rtc/rtc_alarm/rtc_alarm.uf2
  .//rtc/hello_rtc/hello_rtc.uf2
  .//rtc/rtc_alarm_repeat/rtc_alarm_repeat.uf2
  .//dma/channel_irq/dma_channel_irq.uf2
  .//dma/control_blocks/dma_control_blocks.uf2
  .//dma/sniff_crc/sniff_crc.uf2
  .//dma/hello_dma/hello_dma.uf2
  .//gpio/hello_gpio_irq/hello_gpio_irq.uf2
  .//gpio/dht_sensor/dht.uf2
  .//gpio/hello_7segment/hello_7segment.uf2
  .//uart/lcd_uart/lcd_uart.uf2
  .//uart/hello_uart/hello_uart.uf2
  .//uart/uart_advanced/uart_advanced.uf2
新しい開発用のフォルダ
例えば、MyAppというフォルダを作ったとします。ディレクトリはどこでも良いです。 このフォルダには以下のファイルが入っているものとします。
MyApp
 |- MyApp.cpp
 |- MyApp.h
 |- CMakeLists.txt
このとき、cmakeを実行するためにCMakeLists.txtは以下のように記載します。
  cmake_minimum_required(VERSION 3.12)

  # Pull in SDK (must be before project)
  include($ENV{PICO_EXAMPLE_PATH}/pico_sdk_import.cmake)
  include($ENV{PICO_EXAMPLE_PATH}/pico_extras_import_optional.cmake)

  # Initialize the SDK
  pico_sdk_init()

  set(Proj "MyApp")
  project (${Proj})

  add_executable(${Proj}
          MyApp.c
          MyApp.h
          )

  # pull in common dependencies
  target_link_libraries(${Proj} pico_stdlib)

  # create map/bin/hex file etc.
  pico_add_extra_outputs(${Proj} )

  # compile option
  add_compile_options(-Wall -g3 -O0)
これでいずれかにbuildフォルダを作成し、cmake、その後makeをすればuf2ファイルができます。 例えば、MyAppの下にbuildを作ったとすると
 MyApp
 |- MyApp.cpp
 |- MyApp.h
 |- CMakeLists.txt
 |- build
> mkdir build
> cd build
> cmake ..
> make
の順でコマンドを実行します。
MIDIを扱うサンプルプログラム
USB-MIDIでMIDIを扱うサンプルプログラムは以下のフォルダーにあります。
~/pico/pico-sdk/lib/tinyusb/examples/device/midi_test
uf2ファイルは、上で行ったmakeの結果以下のフォルダーにあります。
~/pico/build/usb/device/tinyusb_device_examples/midi_test
このmidi_test.uf2ファイルをpicoにインストールすると、連続してNote On, Note OffのMIDIが出力されます。
pico-sdkに付属しているUSBライブラリ、tinyusbを使ってUSB MIDIを扱うプログラムを書いてみます。
受信したMIDIを、そのまま送信するプログラムを作成します。まず、midi_thrフォルターを作成します。
このフォルダーには、新たに作成するmain.cと
tinyusbのサンプルプログラムの一つmidi_testからusb_config.hとusb_discriptor.cを
以下のディレクトリからコピーします。
さらにpico_exampleからpico_sdk_import.cmakeをコピーします。
~/pico/pico-sdk/lib/tinyusb/examples/device/midi_test
以下のプロフラムをmain.cとしてmidi_thrフォルダーに保存します。
#include "bsp/board.h"
#include "tusb.h"

/*------------- MAIN -------------*/
int main(void)
{
  uint8_t packet[4];
  board_init();

  // init device stack on configured roothub port
  tud_init(BOARD_TUD_RHPORT);

  while (1)
  {
    tud_task();                       // tinyusb device task
    while ( tud_midi_available() ){
      tud_midi_packet_read(packet);   // receive MIDI packet
      tud_midi_packet_write(packet);  // send MIDI packet
    }
  }
  return 0;
}
CMakeLists.txtを以下のように作成します。
  cmake_minimum_required(VERSION 3.5)
  set(FAMILY rp2040)

  include($ENV{PICO_SDK_PATH}/lib/tinyusb/hw/bsp/family_support.cmake)
  include(pico_sdk_import.cmake)

  family_get_project_name(PROJECT ${CMAKE_CURRENT_LIST_DIR})

  project(${PROJECT})
  set(CMAKE_C_STANDARD 11)
  set(CMAKE_CXX_STANDARD 17)
  set(PICO_EXAMPLE_PATH $ENV{PICO_EXAMPLE_PATH})

  add_executable(${PROJECT})
  family_initialize_project(${PROJECT} ${CMAKE_CURRENT_LIST_DIR})

  target_sources(${PROJECT} PUBLIC
          ${CMAKE_CURRENT_SOURCE_DIR}/main.c
          ${CMAKE_CURRENT_SOURCE_DIR}/usb_descriptors.c
  )

  target_include_directories(${PROJECT} PUBLIC
          ${CMAKE_CURRENT_SOURCE_DIR}
  )

  family_configure_device_example(${PROJECT})
midi_thrフォルダーは以下のようになります。
midi_thr
  |- CMakeLists.txt
  |- main.c
  |- usb_descriptors.c
  |- tusb_config.h
  |- pico_sdk_import.cmake
buildフォルダーを作成し、makeします。
> mkdir build
> cd build
> cmake ..
> make
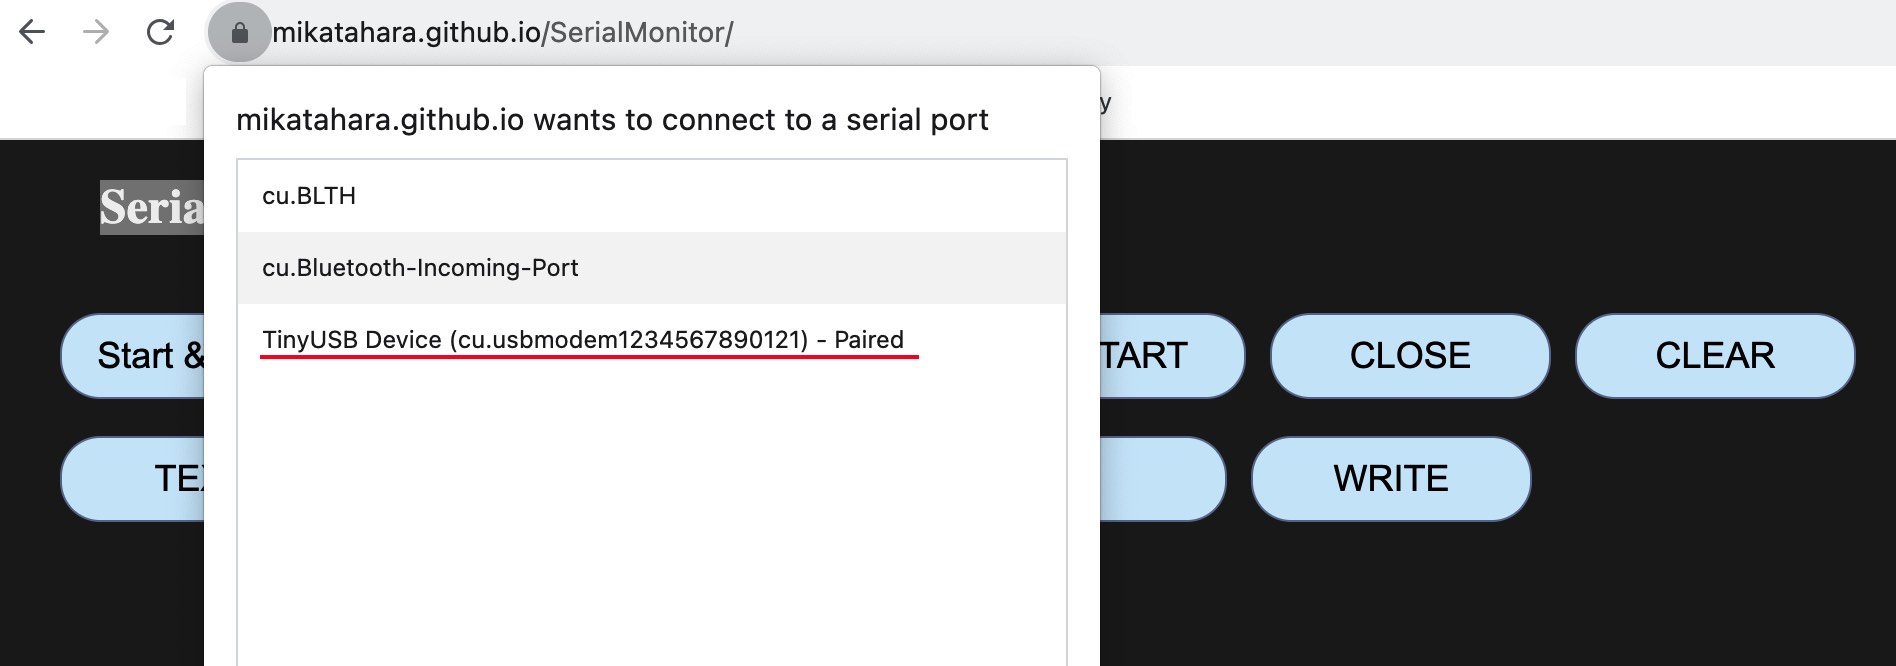
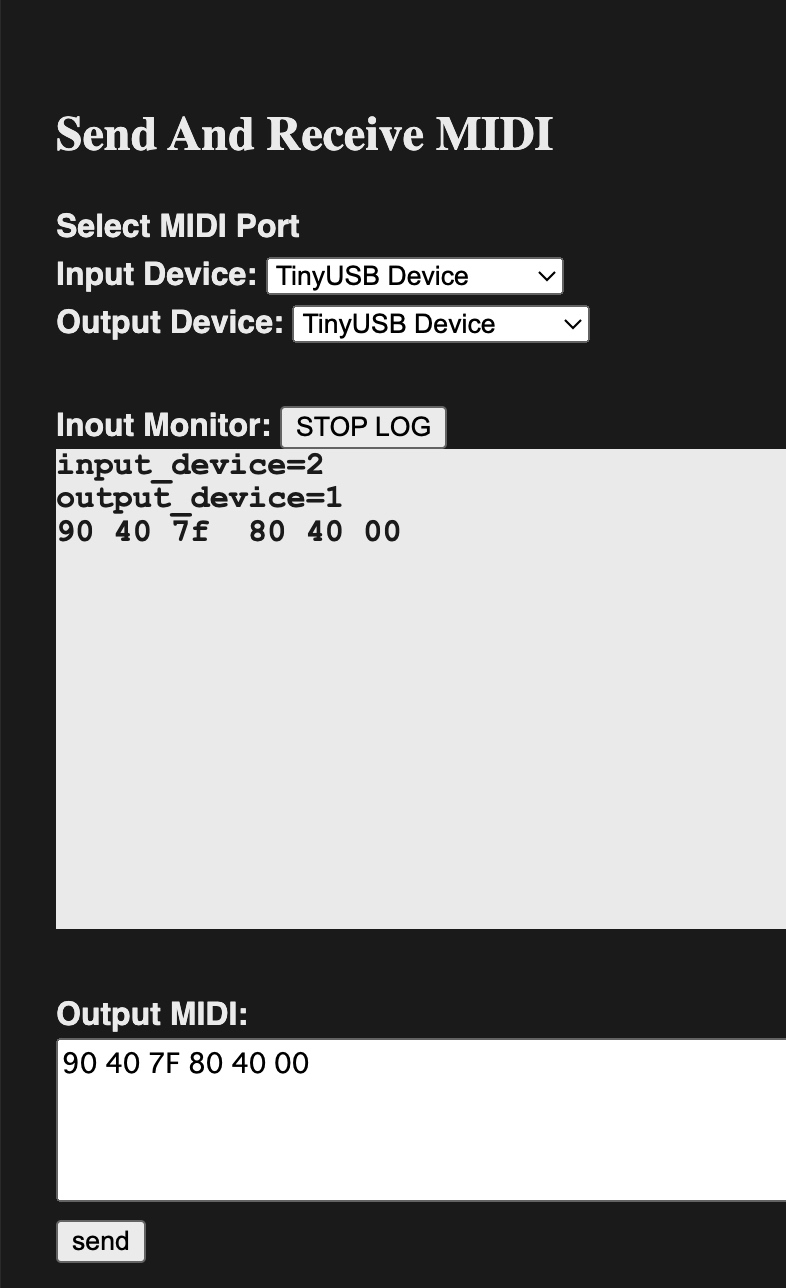
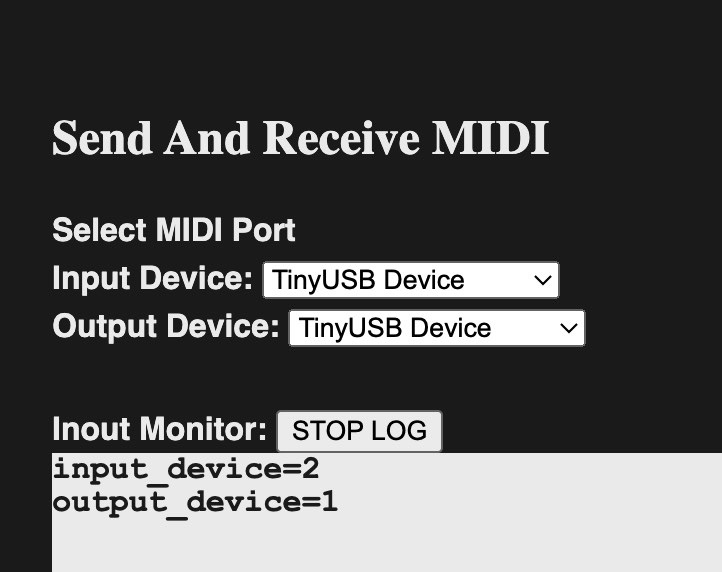
buildフォルダーの中にmidi_thr.uf2ができているはずです。これをpicoにインストールします。 Send and Receive MIDIで確認すると、 TinyUSB Deviceとして認識されています。
midi_thrにprintfを追加
midi_thrにUSB-MIDIで受け取ったMIDIデータをprintfで出力し、シリアルモニターに出力します。
動作させたいプログラムは以下の通りです。 受信したMIDIデータをprintしています。 main.cとします。
<<main.c>>
#include "bsp/board.h"
#include "pico/stdlib.h"
#include "tusb.h"

/*------------- MAIN -------------*/
int main(void)
{
  uint8_t packet[4];
  board_init();
  stdio_init_all();

  // init device stack on configured roothub port
  tud_init(BOARD_TUD_RHPORT);

  while (1)
  {
    tud_task();                       // tinyusb device task
    while ( tud_midi_available() ){
      tud_midi_packet_read(packet);   // receive MIDI packet
      tud_midi_packet_write(packet);  // send MIDI packet
      printf("%02x %02x %02x %02x\n",packet[0],packet[1],packet[2],packet[3]);
    }
  }
  return 0;
}
また、ディレクトリ構成を以下のようにします。
midi_thr_print
  |- CMakeLists.txt
  |- main.c
  |- usb_descriptors.c
  |- tusb_config.h
  |- pico_sdk_import.cmake
tinyUSBを使って2つ以上のUSBの種類(ここではMIDIとシリアル)を扱うには、2つのファイル、 tusb_config.h、usb_descriptors.cを書き換えます。 以下の2つのページを参照させていただきました。
Miscellaneousから2つのファイル、tusb_config.h、usb_descriptors.cをダウンロードします。 これらのファイルは3つのUSBデバイスクラス、CDC(Communications Device Class:シリアル通信)、 MIDI、MSC(USBマスストレージクラス) を使う設定になっていますので、ここからMSCを削除します。修正点を以下に示します。
  <<tusb_config.h>>
  //------------- CLASS -------------//
  #define CFG_TUD_CDC              1
  #define CFG_TUD_MSC              0  //<--- Clear
  #define CFG_TUD_HID              0
  #define CFG_TUD_MIDI             1
  #define CFG_TUD_VENDOR           0
修正後
  <<usb_descriptors.c>>
  //--------------------------------------------------------------------+
  // Configuration Descriptor
  //--------------------------------------------------------------------+

  enum
  {
    ITF_NUM_MIDI = 0,
    ITF_NUM_MIDI_STREAMING,
    ITF_NUM_CDC,
    ITF_NUM_TOTAL
  };

  #define CONFIG_TOTAL_LEN    (TUD_CONFIG_DESC_LEN + TUD_CDC_DESC_LEN + TUD_MIDI_DESC_LEN) 	//<--- Add

    #define EPNUM_CDC_NOTIF   0x81
    #define EPNUM_CDC_OUT     0x02
    #define EPNUM_CDC_IN      0x82
    #define EPNUM_MIDI        0x03

  uint8_t const desc_fs_configuration[] =
  {
    // Config number, interface count, string index, total length, attribute, power in mA
    TUD_CONFIG_DESCRIPTOR(1, ITF_NUM_TOTAL, 0, CONFIG_TOTAL_LEN, 0x00, 100),

    // Interface number, string index, EP notification address and size, EP data address (out, in) and size.
    TUD_CDC_DESCRIPTOR(ITF_NUM_CDC, 4, EPNUM_CDC_NOTIF, 8, EPNUM_CDC_OUT, EPNUM_CDC_IN, 64),

    // Interface number, string index, EP Out & EP In address, EP size
    TUD_MIDI_DESCRIPTOR(ITF_NUM_MIDI, 0, EPNUM_MIDI, 0x80 | EPNUM_MIDI, 64)
  };
修正前
  <<usb_descriptors.c>>
//--------------------------------------------------------------------+
// Configuration Descriptor
//--------------------------------------------------------------------+

enum
{
  ITF_NUM_MIDI = 0,
  ITF_NUM_MIDI_STREAMING,
  ITF_NUM_TOTAL
};

#define CONFIG_TOTAL_LEN  (TUD_CONFIG_DESC_LEN + TUD_MIDI_DESC_LEN)

#if CFG_TUSB_MCU == OPT_MCU_LPC175X_6X || CFG_TUSB_MCU == OPT_MCU_LPC177X_8X || CFG_TUSB_MCU == OPT_MCU_LPC40XX
  // LPC 17xx and 40xx endpoint type (bulk/interrupt/iso) are fixed by its number
  // 0 control, 1 In, 2 Bulk, 3 Iso, 4 In etc ...
  #define EPNUM_MIDI_OUT   0x02
  #define EPNUM_MIDI_IN   0x02
#elif CFG_TUSB_MCU == OPT_MCU_FT90X || CFG_TUSB_MCU == OPT_MCU_FT93X
  // On Bridgetek FT9xx endpoint numbers must be unique...
  #define EPNUM_MIDI_OUT   0x02
  #define EPNUM_MIDI_IN   0x03
#else
  #define EPNUM_MIDI_OUT   0x01
  #define EPNUM_MIDI_IN   0x01
#endif

uint8_t const desc_fs_configuration[] =
{
  // Config number, interface count, string index, total length, attribute, power in mA
  TUD_CONFIG_DESCRIPTOR(1, ITF_NUM_TOTAL, 0, CONFIG_TOTAL_LEN, 0x00, 100),

  // Interface number, string index, EP Out & EP In address, EP size
  TUD_MIDI_DESCRIPTOR(ITF_NUM_MIDI, 0, EPNUM_MIDI_OUT, (0x80 | EPNUM_MIDI_IN), 64)
};
CMakeLists.txtに1行挿入します。
  <<CMakeLists.txt>>
  cmake_minimum_required(VERSION 3.5)
  set(FAMILY rp2040)

  include($ENV{PICO_SDK_PATH}/lib/tinyusb/hw/bsp/family_support.cmake)
  include(pico_sdk_import.cmake)

  family_get_project_name(PROJECT ${CMAKE_CURRENT_LIST_DIR})

  project(${PROJECT})
  set(CMAKE_C_STANDARD 11)
  set(CMAKE_CXX_STANDARD 17)
  set(PICO_EXAMPLE_PATH $ENV{PICO_EXAMPLE_PATH})

  add_executable(${PROJECT})
  family_initialize_project(${PROJECT} ${CMAKE_CURRENT_LIST_DIR})

  target_sources(${PROJECT} PUBLIC
          ${CMAKE_CURRENT_SOURCE_DIR}/main.c
          ${CMAKE_CURRENT_SOURCE_DIR}/usb_descriptors.c
  )

  target_include_directories(${PROJECT} PUBLIC
          ${CMAKE_CURRENT_SOURCE_DIR}
  )

  # enable usb output, disable uart output
  pico_enable_stdio_usb(${PROJECT} 1)

  family_configure_device_example(${PROJECT})
以下のコマンドでコンパイルすることができます。
  > cd midi_thr_print
  > mkdir build
  > cd build
  > cmake ..
  > make
buildの下にmidi_thr_print.uf2が出来ていれば成功です。 しかし、makeの途中で以下のようなERRORが出る場合があります。
  pico/pico-sdk/src/rp2_common/hardware_flash/flash.c: In function 'flash_range_erase':
  pico/pico-sdk/src/rp2_common/hardware_flash/flash.c:71:30 error: declaration of 'flash_range_erase' shadows a global declaration [-Werror=shadow]
     71 |     rom_flash_range_erase_fn flash_range_erase = (rom_flash_range_erase_fn)rom_func_lookup_inline(ROM_FUNC_FLASH_RANGE_ERASE);
        |                              ^~~~~~~~~~~~~~~~~
  compilation terminated due to -Wfatal-errors.
  cc1: all warnings being treated as errors
  make[2]: *** [CMakeFiles/midi_thr_print.dir/pico/pico-sdk/src/rp2_common/hardware_flash/flash.c.obj] Error 1
  make[1]: *** [CMakeFiles/midi_thr_print.dir/all] Error 2
  make: *** [all] Error 2
この場合はpico/pico-sdk/lib/tinyusb/hw/bsp/family_support.cmakeを1箇所コメントアウトします。
# -Wshadow
これでエラーが消えると思います。 MIDI Send and RecieveとSerial MonitorでTinyUSBデバイスを確認することができます。
Send And Receive MIDI
シリアルモニタ